Starting in WordPress version 5.5, you can now set your plugins to automatically update.  This is not only a big time saver, especially if you have a lot of sites which you oversee like myself, but it also helps to keep your site less vulnerable to backdoor hacks by way of out of date plugins. Best of all, it’s incredibly easy to do and you don’t need an external plugin to do this for you, so let’s talk about how to automatically update WordPress plugins.
How to Automatically Update WordPress Plugins
Step 1 – Log Into Your WordPress Dashboard
First thing’s first, log into your WordPress dashboard.
Step 2 – Click on “Plugins” From the WordPress Dashboard Menu
Next, navigate to the plugins section of your WordPress dashboard. Specifically you want to navigate to the “installed plugins” section, though just clicking on the “plugins” menu item from your dashboard will take you to the same page.
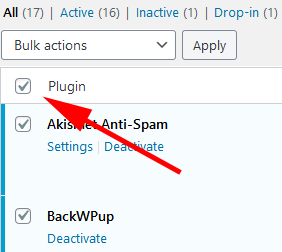
Step 3 – Tick Box to Select All Plugins
Ticking the box displayed in the image below will select all plugins. Be sure to have “all” plugins selected to ensure that this applies to both active and inactive plugins. Even if a plugin is inactive, it’s still installed on your server and therefore can be the target of hackers and can be exploited. Therefore it’s important to go with the detail of “all” plugins.
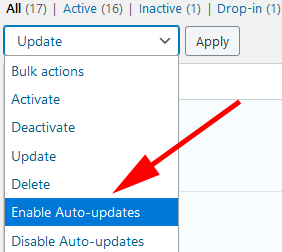
Step 4 – Select “Enable Auto-updates” from drop-down list.
Select the drop-down list and highlight and click “Enable Auto-updates”.
Step 5 – Click Apply and You’re Done!
With that, your WordPress plugins will now automatically install the latest version of themselves whenever a new one becomes available.
Be sure to keep on top of WordPress core updates when they become available. Although these by default will eventually update, updates to WordPress version themselves should be installed as soon as they become available as they provide important security updates to keep your site safe and secure.
